> For the complete documentation index, see [llms.txt](https://docs.greytrix.com/llms.txt). Markdown versions of documentation pages are available by appending `.md` to page URLs; this page is available as [Markdown](https://docs.greytrix.com/gumu-salesforce-integration/general-salesforce-settings.md).
# General Salesforce Settings
### Package Installation
Now once you have completed your pre-installation checklist you can either obtain the package link from the App Exchange, or we can manage the installation process on your behalf. Once the **GUMU™** package has been installed successfully within Salesforce, you will find two new applications that can be accessed via the App Launcher. These applications include **GUMU™ Settings**, which is focused on configuration, and **GUMU™ Integration**, designed to improve the user experience. To begin the installation of the package, please follow the steps in our guide below.
Ready for the Package Installation? Once you have your pre-installation checklist complete follow our step by step guide.
1. Enter your username and password for the Salesforce organization in which you want to install the package, and then click Log In.
2. To allow users to create a Quote and email a PDF of the quote to customers, we need to enable the Quotes from the Quotes setting, in the Quick Find box, search for Quote and then click on the Enable Quotes checkbox.
3. A new page will appear to select the page layout.
4. After logging in, navigate to the URL and paste the GUMU™ package URL provided by the Greytrix team, and hit Enter on your keyboard.
5. You will be navigated to the Install GUMU™ Installation screen, click on the Install for All Users and click Install.
6. After a few minutes, the package will get installed in your Salesforce org, navigate to Setup > Quick Find > search for Installed Packages (you will see the recently installed packages here).
7. In the same way install the Quote to Order Flow package so that Orders can be generated from Quotes.
**Additional Packages to be installed:**
* Last Sync Update Flow
* Log Deletion Flow
8. Upon Package installation, 2 GUMU™ applications will appear in the App Launcher of Salesforce.
### **Pre-Configuration Step**
The GUMU™ integration uses Web Service to communicate with Sage. Before configuring Web Service in the GUMU™ Configuration Tab, we need to specify and save the URL in Salesforce Remote Site Settings.
1. Login to Salesforce.
2. Navigate to the Setup, under the quick find search for Remote Site Settings, a new screen will appear, click the New Remote Site button.
3\. Enter the Remote Site Name and Remote Site.
4\. Click the Save button to complete the current setting or click the Save & New button to save your site and begin adding a new site.
After installing the **GUMU™ Integration** package, granting user access doesn’t have to be a manual, time-consuming task. Instead of configuring individual object, field, or tab permissions, you can quickly assign the GUMU™ license and permission set to any user in just a few steps.
This process ensures that users can seamlessly access GUMU™ components such as Real-time data, Logs, Integration Configurations, and more without compromising security or functionality.
### **Granting User Access**
#### **Let’s understand this with an Example**
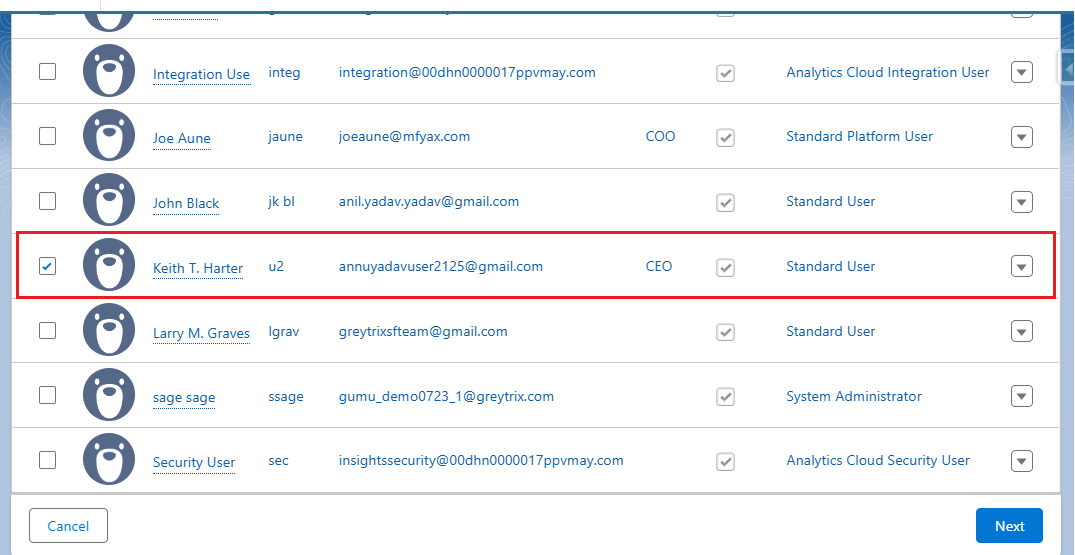
Imagine a user, **Keith T. Harter**, and you want to provide him access to the GUMU™ features. Follow these steps:
1. Navigate to the GUMU™ Integration package from Installed Packages, and then click on Manage Licenses.
2. Click on the **Add Users** button to add the users.
3. Navigate to Setup → Permission Sets.
4. Search for "GUMU Integration Access" permission set & Click on it.
5. Click on Manage Assignments.
6. Click Add Assignments and then select the users who need access to the GUMU™.
7. Finally, click Assign. You can now view the recently added user on the Current Assignments page.
That’s it! Keith now has all the necessary GUMU™ permissions no need to manually touch field-level security or profiles.
To access integration features based on Salesforce users and their respective Profile levels.
8. Navigate to **GUMU Settings** → **Security Matrix** tab.
Assign feature rights to the specific profiles/users.